2.3. Named Package
In the previous section, we created and compiled code in the default package. However, as we mentioned earlier in the chapter, we want to create named packages for better code organization. Additionally, while code in the default package can access code in other packages, the reverse is not true. That is, if we want the code we write to be usable to code in other packages, it needs to be in a named package.
To place a class (or interface) in a named package, you must do two things:
Place the
.javafile in the appropriate package directory; andInclude a
packagestatement at the top of the.javafile.
2.3.1. Creating the Package Directories
In this section, our named package will be called cs1302.hello and we
will place the HelloWorld class inside of that package. Therefore, at
the end of the section, the FQN for the class will be cs1302.hello.HelloWorld.
Remember, the src directory you created in the previous section is
called the default package for source code. This directory serves
as the base directory for named packages that you will create. You
can think of it as the top-level directory for your package
directories. Our package directories will be contained within the
src directory.
To create the package
cs1302.hello, we will need to create separate directories undersrcusing themkdircommand. One forcs1302and the other forhello. On Odin, go ahead and setup the following subdirectory structure undersrc:cs1302-packages |--- bin |--- src |--- HelloWorld.java |--- cs1302 |--- helloEach subdirectory within
cs1302-packagesplays a role in the example. Here is a breakdown of the different subdirectories and their roles:binis the default (no-name) package directory for our compiled code (default package for compiled code);srcis the default (no-name) package directory for our source code (default package for source code);cs1302is thecs1302package directory; andhellois thecs1302.hellopackage directory.
Important
While we have to create directories that correspond to packages, not all directories on Unix are package directories. In the directory structure above, only the
cs1302andhellodirectories correspond to Java packages. The others are default package directories and the directory for the tutorial.If you aren’t in the
cs1302-packagesdirectory, change into it and run thetreecommand to make sure the directory contains all of the required subdirectories and that those subdirectories are organized correctly. The output should look similar to the above withHelloWorld.javastill contained within thesrcfolder.Move the
HelloWorld.javafile into thecs1302.hellopackage directory using the following command:mv src/HelloWorld.java src/cs1302/hello/
Understanding the Command
The command above moves the
HelloWorld.javafile from the default package (src) into a directory that corresponds to the named package we are moving it into (cs1302/hello).Notice that the package directory (
cs1302/hello) is directly inside of the default package (src) and that the names of the folders match the package names. This structure will be the same whenever a file is in a named package.
Short Video Demo of the Steps Above
Here is a short video demonstrating these steps in case you get stuck:
2.3.2. Adding the Package Statement
Using Emacs, edit the HelloWorld.java file and add the following
package statement at the top:
package cs1302.hello;
In Java, a package statement, if included, must be the first line of code in the file (excluding comments and white space).
Go ahead and close Emacs. Completing this step satisfies the second requirement for placing a class in a named package.
2.3.3. Compiling the Program
Compile the program using the following command (don’t forget tab completion - you don’t want to type the whole command):
javac -d bin src/cs1302/hello/HelloWorld.java
Understanding the Command
This command is almost identical to the compilation command in the previous section that compiled code in the default package. The only change is the relative path to the file.
In English, this command tells the Java compiler to: “compile the
HelloWorld.java file located in the src/cs1302/hello folder
and place the resulting .class file in the bin folder.
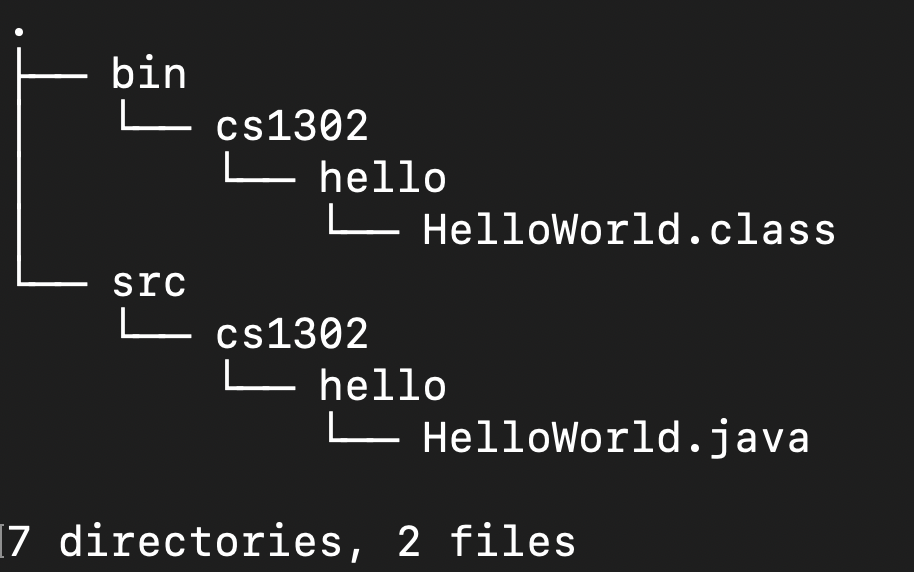
Execute the tree or find command. Note that the HelloWorld.class file
was created under bin/cs1302/hello. The output of tree should
look the same as the output below. Notice that the compiler
automatically created the necessary package directories for our
compiled code under bin! It was able to do this because we
correctly added the package statement to the top of the source file.
Troubleshooting
If your HelloWorld.class file is located under the bin folder
and not in the package directory, check the package statement
in your HelloWorld.java file.
Also, if you see any tilde (~) files, those are just backup copies of older versions of your files. You can ignore those.
If you see any other differences between your output and the output
above, you likely have a small error in a command or your package
statement in the HelloWorld.java file. Double-check that you
did everything correctly and, if you need assistance, take a look
at the video demo found later in this section. Also, feel free to
post a screenshot of your tree or find output to
Piazza.
2.3.4. Running the Program
Run the program using the java command:
java -cp bin cs1302.hello.HelloWorld
Understanding the Command
This command is almost identical to the execution command in the previous section that ran the code in the default package. The only change is the FQN. Note that the package is now part of the FQN!
In English, this command tells Java to: “run the
HelloWorld.class file with FQN cs1302.hello.HelloWorld and, if
that file is not in the present working directory, it should check the
bin folder as well. Notice that we do not need to tell it the
subdirectories within bin as those are implied by the FQN.
PROTIP: Although packages correspond to directories, a fully
qualified name (FQN) uses . (dot) for the name separator and not
a slash.
Test Yourself
Change directories into your home directory and see if you can run
HelloWorld.class from that location. Note: The relative path
you provide as part of the classpath -cp will have to change. What
about the FQN? Write the command you used in your notes.
Congratulations on compiling your code to a named package! Don’t delete your work unless you want to work through the tutorial again for extra practice. The next section will continue where this one left off.
Short Video Demo of the Steps Above
Here is a short video demonstrating these steps in case you get stuck:
2.3.5. Additional Practice
Additional Practice - Video
If you’d like some extra practice compiling and running code in a Unix environment, follow along with Dr. Barnes as he works through another example.
https://www.youtube.com/watch?v=vuenX567T6c